EC2에 HTTPS 설정을 해보자
https 처리를 하는데 기존 서버에서 뭔가 문제가 있는지 설정이 잘 되지 않았다. 이참에 AWS도 다시 공부하고 서버도 우분투로 리뉴얼할 겸 새로 셋팅을 시도해 보았다.
Ubuntu 셋팅
1
2
sudo su # root 로 변환
passwd root # root 권한 패스워드 설정
Ubuntu에 도커 설치
1
2
3
4
5
6
7
8
9
10
11
12
13
14
15
16
# Add Docker's official GPG key:
sudo apt-get update
sudo apt-get install ca-certificates curl
sudo install -m 0755 -d /etc/apt/keyrings
sudo curl -fsSL https://download.docker.com/linux/ubuntu/gpg -o /etc/apt/keyrings/docker.asc
sudo chmod a+r /etc/apt/keyrings/docker.asc

# Add the repository to Apt sources:
echo \
  "deb [arch=$(dpkg --print-architecture) signed-by=/etc/apt/keyrings/docker.asc] https://download.docker.com/linux/ubuntu \
  $(. /etc/os-release && echo "$VERSION_CODENAME") stable" | \
  sudo tee /etc/apt/sources.list.d/docker.list > /dev/null

sudo apt-get update

sudo apt-get install docker-ce docker-ce-cli containerd.io docker-buildx-plugin docker-compose-plugin
도커 실행 권한 설정
1
2
3
sudo groupadd docker # docker 그룹을 생성
sudo usermod -aG docker ubuntu #사용자를 docker그룹에 추가
newgrp docker #그룹에 대한 변경 사항을 활성화
root권한이 없을때도 도커를 실행할 수 있게 권한을 주는 과정이다. 위의 설정을 해주어야 CI / CD 수행시 권한 오류가 발생하지 않는다.
HTTPS 설정
https 통신을 하기위해선 인증서를 설치한 후 nginx에 설정파일(nginx.conf)을 수정해야 한다.
nginx 설치
1
sudo apt-get install nginx
- nginx 설정파일 [/etc/nginx/nginx.conf]을 아래와 같이 수정해 준다.
1
2
3
4
5
6
7
8
9
10
11
12
13
14
15
16
17
18
server {
    server_name lizcalendal.com;

    location / {
            proxy_set_header HOST $host;
            proxy_pass http://127.0.0.1:8080; # 8080 으로 리다이렉트
            proxy_redirect off;
    }

    location /api {
         proxy_set_header HOST $host;
         proxy_pass http://127.0.0.1:3000; # Spring Boot로 리다이렉트 되도록 설정
         proxy_set_header X-Real-IP $remote_addr;
         proxy_set_header X-Forwarded-For $proxy_add_x_forwarded_for;
         proxy_set_header X-Forwarded-Proto $scheme;
         proxy_redirect off;
    }
}
인증서 설치
유료 인증서도 있겠지만 지금 작업은 무료 인증서를 사용해서 진행하겠다.
1
2
3
4
5
sudo apt update
sudo apt install snapd # certbot 설치를 위한 snapd 를 설치한다.
sudo snap install --classic certbot # snapd 을 이용해서 certbot 설치
sudo ln -s /snap/bin/certbot /usr/bin/certbot # certbot 명령어를 어느위치에서든 실행할 수 있도록 설정
sudo certbot # certbot 실행
인증서 설치 완료 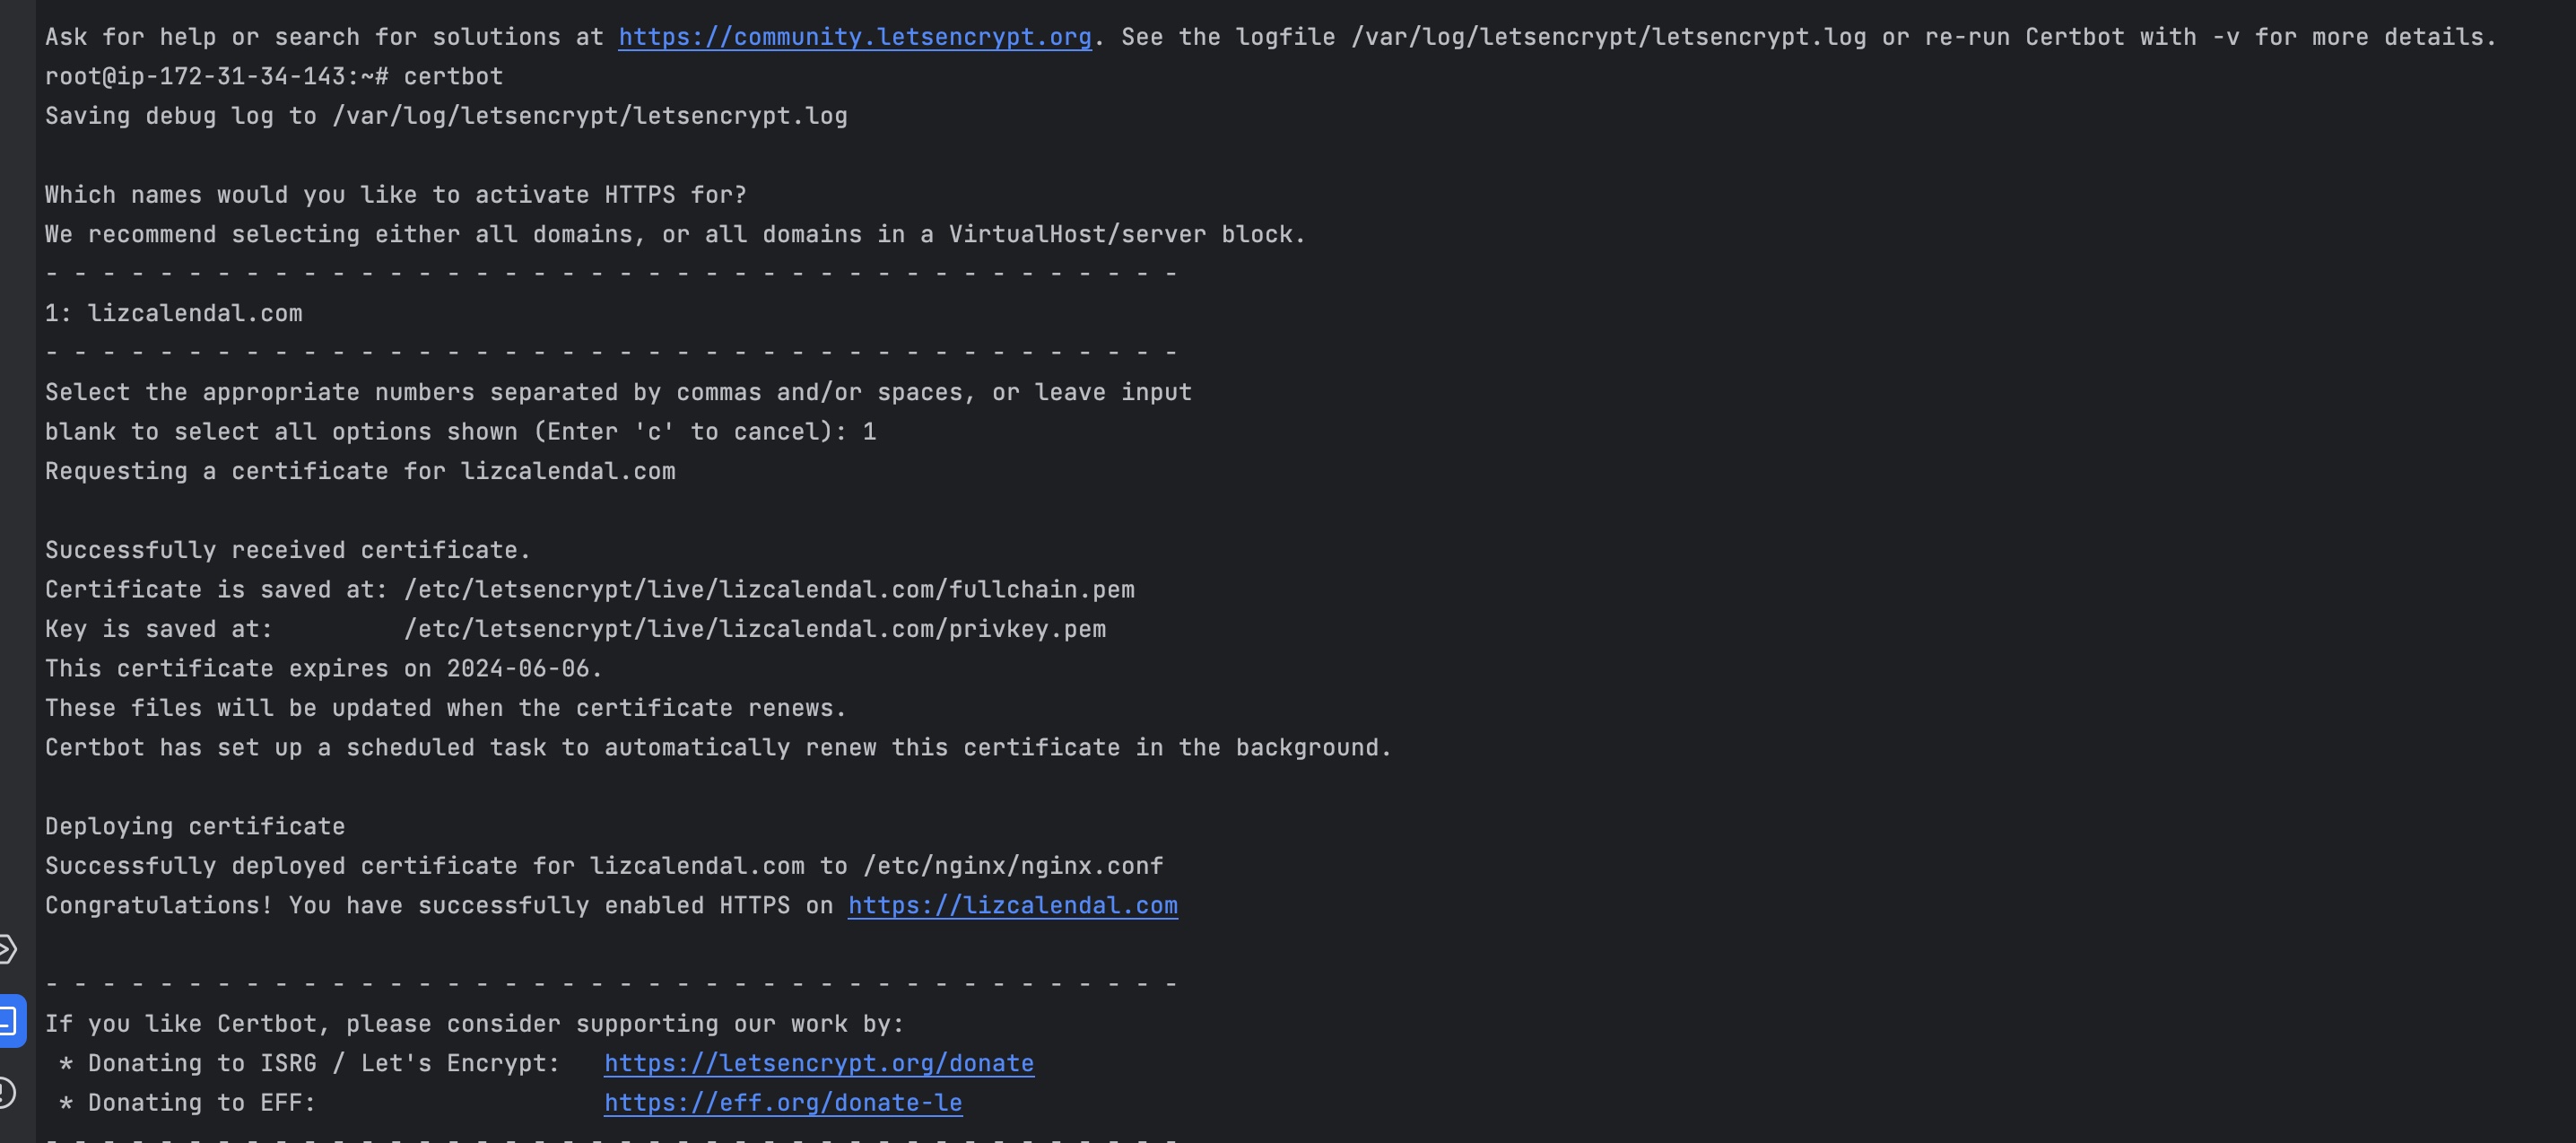
이 인증서는 3개월마다 아래의 명령어로 갱신 해줘야 한다. ( 아래의 명령어를 crontab에 등록해두자)
1
sudo certbot renew --dry-run
인증서 설치 작업이 완료되면 nginx 시작
1
sudo systemctl start nginx
인증서 설치 작업이 완료 되면 443 포트로 https 통신이 가능해 진다.
React 코드 수정
나의 프로젝트는 프론트에는 react, 백엔드는 springBoot를 사용하였다. 기존에는 리엑트에서 스프링부트로 바로 api 호출을 날렸었다 아래와 같이
1
http://lizcalendal.com:3000
문제가 많은 코드이다. 외부로 포트번호가 노출되어있고 https가 아닌 http로 통신하기 때문이다. 이 문제점을 nginx를 통해 개선해 보자.
nginx 설정을 다시 보자
1
2
3
4
5
6
7
8
 location /api {
       proxy_set_header HOST $host;
       proxy_pass http://127.0.0.1:3000; # Spring Boot로 리다이렉트 되도록 설정
       proxy_set_header X-Real-IP $remote_addr;
       proxy_set_header X-Forwarded-For $proxy_add_x_forwarded_for;
       proxy_set_header X-Forwarded-Proto $scheme; # 추가
       proxy_redirect off;
    }
/api 로 들어오는 요청을 모두 http://127.0.0.1:3000 로 redirect시키는 명령어다. 즉 브라우져에서는 https 통신으로 nginx와 통신하고 api는 nginx가 호출해주는 방식인 것이다.
따라서 위의 api 호출 코드를 수정하도록 하자
1
https://lizcalendal.com/api
백엔드 코드 수정
nginx에서 api를 호출하기 때문에 cors 관련 설정을 추가적으로 해주어야 한다. 아래는 spring-security 코드의 일부 이다.
1
2
3
4
5
6
7
8
9
10
11
12
13
  @Value("${cors.allowed-origins}") // application.properties 에서 가져옴
  private String allowedOrigins;    // 이 경우 https://lizcalendal.com

  CorsConfigurationSource corsConfigurationSource() {
    CorsConfiguration configuration = new CorsConfiguration();
    configuration.setAllowedOrigins(List.of(allowedOrigins));
    configuration.setAllowedHeaders(List.of("Authorization", "Content-Type"));
    configuration.setAllowedMethods(List.of("GET", "POST", "PUT", "DELETE", "OPTION"));
    UrlBasedCorsConfigurationSource source = new UrlBasedCorsConfigurationSource();
    source.registerCorsConfiguration("/**", configuration);
    return source;
  }
참조
Install Docker Engine on Ubuntu